Tuesday, December 30, 2008

Just for Fun Cake

This cake really was, "just for fun." I made it to try out a couple of different techniques. I'll tell you all about those later! When I had some last night after dinner, I thought it looked as if it should be mint chocolate chip flavored, but it's not! It is a delicious moist buttermilk layer cake, buttercream frosting, and my from scratch fondant.


One of the ideas that I wanted to try was wrapping the still warm cakes in plastic wrap. This traps the heat inside the plastic and nature does it's thing with condensation and all, and well, I was trying to see if this would make an even MOISTER buttermilk layer cake. So here they are all wrapped up and cozy:


Here's the Perfect Buttercream Recipe:

1 Cup Shortening
1 Cup Butter
8 Cups Powdered Sugar
1/4 teaspoon Salt
2 teaspoons Vanilla
6 ounces Milk

I usually forget to take the butter out of the fridge to soften it, so I pop it into the microwave for about 15 seconds. Beat the butter and shortening in the mixing bowl of the Kitchen Aid. Scrape down the sides of the bowl. Add the remaining ingredients to the bowl and beat for a minute or two, scraping down the bowl every so often. Here are my secrets: don't add all the milk at once. Add a little at a time to make sure your frosting doesn't get too soupy. If you don't want slightly off white frosting use clear vanilla extract. This makes enough frosting to cover two layers of an 8" or 9" cake or one sheet cake. Basically, this is enough frosting for one standard cake recipe or 24 cupcakes! The recipe is halved in this picture:


Fondant needs something to stick to. A thin layer of buttercream frosting or melted jam does the trick. Here is the cake, crumb coated with my "Perfect Buttercream":


This fondant was a bit of an experiment as well. I was out of shortening when I made it and substituted a splash of oil instead. It wasn't quite supple enough, I'll share the fondant recipe another time! But I'll tell you the trick to rolling out fondant, use LOTS of powdered sugar. As you will see in the picture, I rolled it out on silpat and used a generous dump truck load of powdered sugar. Powdered sugar under and on top of the fondant helps get it on and off the rolling pin for the big move to the cake (have a bench scraper handy to loosen up any sticky spots):


Rolling the fondant a bit bigger than you anticipate needing, makes it a bit easier to smooth the fondant onto the cake, especially around the bottom edge of the cake. If the fondant is rolled too small it tends to wrinkle around the bottom edge. Hands work well to smooth out the fondant, there's also a neat tool that looks like a trowel made of plastic that works well too (there it is in the picture above). The best tool I've found to trim fondant is a pizza wheel. It works like a charm and doesn't tear the fondant. You can even roll it through some powdered sugar to keep it from sticking.


I wanted to pipe melted chocolate on the cake in a graphic pattern to contrast the muted green fondant. I think that my chocolate was a little too warm and the hole in my parchment paper piping bag was a bit too big. It was a little tricky to get control over the chocolate. I think I probably should have drawn out my design in advance too, but never-the-less it is pretty cute:


I noticed when I looked at this picture, that the colors of the cake reflect the muted browns and greens outside. I can't wait to make a cheery spring time cake!


Here's the 4" Danny DiVito cake to the 6" Arnold Schwartzenagger cake. I call it the "Puffy Cake":


Sunday, December 21, 2008

Christmas Tree Cake

This cake was requested yesterday! So I baked up a delicious Baker's Cakes Signature Chocolate Cake and stuck it in the freezer as soon as it cooled to room temperature. This makes it much easier to carve and frost. I used an 8" layer, two 6" layers, and a 4" layer rounds. I frosted it with yummy buttercream frosting.


I started layering the cakes and doweled them (just in case). We can't have any caketastrophies with less than a few hours to spare!


After carving the layers, I popped it into the fridge to firm up a bit.


Voila! Here's the tricky thing about frosting a cake with buttercream from a pastry bag. The heat from your hands melts the butter in the frosting and can start to become a pile of glop on your cake. I found it useful to refill a smaller pastry bag several times, instead of heating all the buttercream accidentally in a large bag. I have cold hands in general, and that seems to help!


Left over cake bites made the perfect presents. I dipped the bites into some white chocolate dip and waited for them to harden.


When they had hardened I mixed an edible paint made of cake decorators gold dust and vodka. Why vodka? The alcohol evaporates faster than water (I think, at least that's what Duff uses on the Ace of Cakes!)


I placed some red hot candies and piped on some royal icing garland. That star looks a bit crooked! Honestly, I didn't drink any of my paint.


I finished the cake by painting the garland with the gold paint and off the cake went to it's final destination!


Saturday, December 20, 2008

Gimghoul Gingerbread Castle


Here are some details from the Gingerbread Castle. Have I mentioned that we dusted the details with gold powder? It was a true labor of love, or insanity, one or the other!


I think this picture shows the ivy leaves nicely.


Unfortunately, here you can see what the little one was doing while I was "working."


The rock walls at The Gimghoul Castle actually look like this!


Argh. 2nd Place. My oldest child just received a progress report that said he is a bit competitive, and not always a good sport when he loses. I don't know where he gets it from. 

A New Year a New Blog


Welcome to the new home of Baker's Cakes: The Blog. In the spirit of the new year and resolutions and all that, I decided to bring the blog to a bigger forum, so here it is! I'll begin posting all my projects on this blog. I plan to update www.bakers-cakes.com as regularly as I can. I realize that some people are having difficulty viewing it, and for that I apologize, I'll try to iron that out too! In case you missed them, here are some recent projects: 


Mountain Bike Cake!


Santa Cake Bites


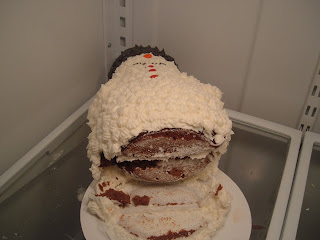
In the interest of full disclosure, here's a toppled snowman. Yup, this was one of those caketastrophies that happens every so often!


Christmas Cookies


This is a detail from this year's Carolina Inn Gingerbread House Competition. My friend Emily and I worked on this for hours. I really put a lot of blood, sweat, and sugar into it. You would not believe how sticky the kitchen floor got from this project! I'm trying to recover from finding out this received 2nd place from the pastry chef. Argh. I have a theory that like art, gingerbread is subjective. I can not bear to stick candy all over my house, I think it looks tacky. I prefer to hand create each and every detail. In this house, each ivy leaf was individually piped on, each dragee was painstakingly placed with tweezers. Tweezers for goodness sakes!!! 2nd place? Argh!

ShareThis